
Mind and Hand by Snively '11
My first CNC project
I’ve already mentioned how busy I am this semester and have gone over my schedule, but now it’s time to show just what I’ve been busy with! One of my classes, 2.008, focuses on manufacturing and machining, meaning that we learn to *gasp* manufacture and machine things.
MIT has always bragged about its motto, “Mens et Manus,” or “Mind and Hand,” because we’re constantly creating, building, and getting dirty. I’ve done my fair share of building since I’ve gotten here (plastic bottle pirate ship, 4 robots, an Olmec, etc) but all of that used skills that I really already had. This last week, however, I learned something new. I learned how to use a CNC lathe and a CNC mill.
For those of you who are unacquainted, a lathe and a mill are tools used to machine metal/plastic/anything that needs to be shaped into a part. A lathe is for radially symmetric features and spins your part really fast, letting you touch it with sharp tools to cut grooves, pockets, round edges, so on and so forth. A mill is essentially the lovechild of an etch-a-sketch and a drill press. Using two dials you can move your part around on a table (like an etch-a-sketch) and then when you pull a lever you can lower a drill bit into it (like a drill press). The main difference is that you can move the part around while the drill bit (actually called an “end mill”) is in the part, cutting grooves, notches, and all sorts of neat shapes into it. The “CNC” means that these tools are computer controllable. Come on, you know how hard it is to make a circle on an etch-a-sketch! CNC lets you design parts in SolidWorks, import them into a program called “MasterCAM,” and then load them onto the mills/lathes. Then the tool does all the work for you, spitting out a finished part in just a few minutes. Neat, huh?
Later in the semester we’ll be using these to create aluminum molds to injection mold yo-yos with. Until then, we were assigned a “Learn to use the equipment” project of machining a paper weight. Each of us was given a piece of aluminum stock, 1.5″R with a height of .625″. We were allowed to do pretty much anything possible, but we had to use both the lathe and the mill. We designed our paper weights in SolidWorks first, the easiest way to bust out a 3D part.
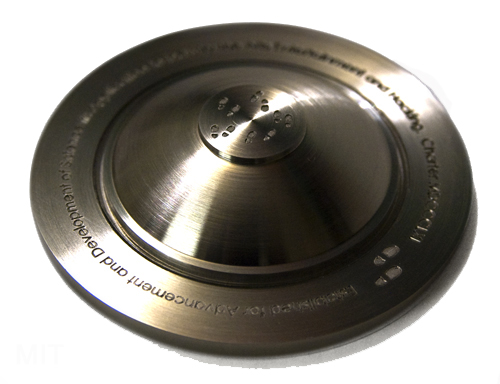
I didn’t want my paper weight to suck. This had the potential to be a really nice product, something that I could keep forever, so I got a kind of intricate with my design. I decided to machine the great dome, with some special features. Here’s what my finished SolidWorks file looked like
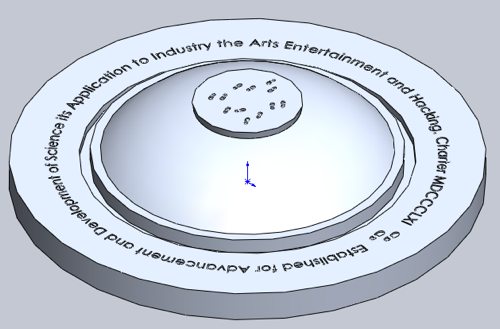
As you can see, I added some footsteps to the top of the dome, because I’m pretty sure there are some. I also put the “Inscription Hack” around the perimeter of the dome. Awesome, looks good in SolidWorks, how’s it going to look in real life?
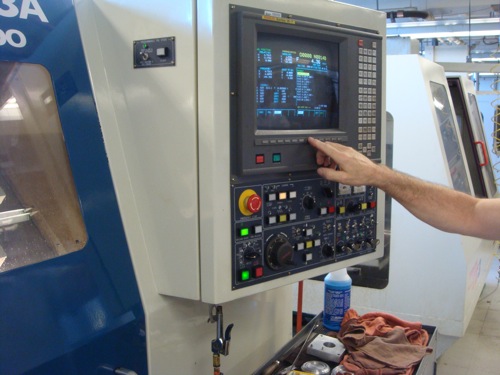
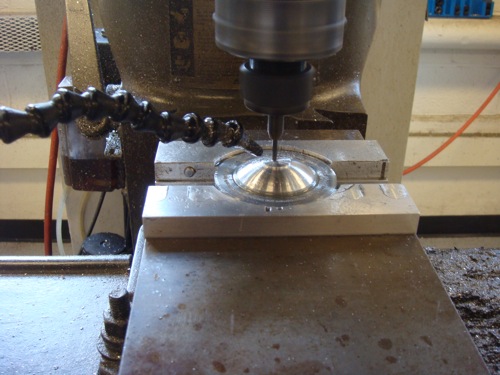
The first thing to do was to “turn” the part. Never say “lathe” the part, it’s called “turning.” We put my aluminum stock in the machine, closed the doors, and checked through my code using the control panel on the outside. If there is anything more intimidating I have yet to encounter it. It was the scariest thing ever, but luckily shop guys are VERY good at what they do. Please note that that hand is certainly not mine.
Once it was all set we hit “GO” and off it went! The part spun and the tools cut into it. There was a lot of coolant splashing everywhere so it was hard to get really good pictures, but here are a few I managed to get.

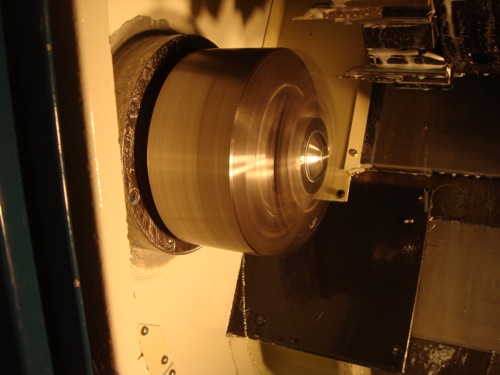
I made a video of the final run of the paper weight so you can see the lathe in action.
Without a CNC I dare you to get that kind of curve. Consider yourself dared.
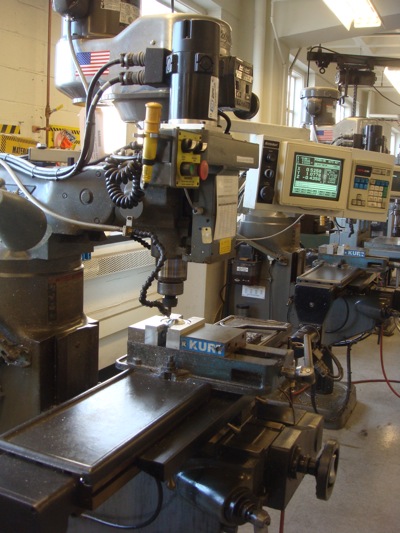
So, I had a perfectly shaped little dome, next it was time for the mill. The mill was programmed to etch the writing and the footsteps into my paper weight, one at a time, using an engraving tool with a tip only .02″ in diameter (TINY!). I popped the part into the vice, set my zero at the top of my part, and pushed “GO!” ~20 minutes later (lots of etching) it was all finished, but while it was being etched it looked like this
Finally it was all done! Well, sort of. I cleaned it up with a rag and some hot water, then I took it over to a normal lathe (not CNC) and let it spin while I touched it with some fine grit sandpaper to polish it. When everything was all said and done I had this lovely before and after picture to take
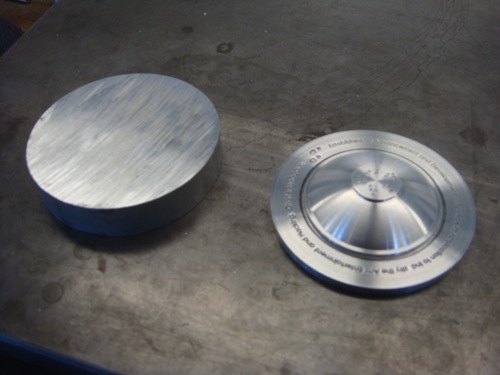
Isn’t that awesome!? But, there was an issue. Well, there were two issues. I realized shortly after polishing it up that there was a “u” missing “Industry.” The space was there, just no letter, so it looked like “Ind stry.” Not good. Then I noticed that I spelled “science” as “sceince.” Those of you who know me know that I am WAY too obsessive compulsive to be ok with this, so I ended up re-machining the whole thing after making the changes on the computer.
When everything was all said and done, I had a beautiful paper weight that I was really proud of. Will I make another? Potentially, the code is all there. Will I make many awesome things in the future with my newly learned skills? Absolutely.
What an absolutely lovely paperweight! I actually recognized the image/text right away before reading the blog.How come you were not in the NYTimes article? Just bad timing?-‘cos I know you’re not a shy, wallflower type. Or did higher-ups decide who should be there? Not that Jess, Chris & Paul were undeserving or anything….
that is the pure result of loving your study…beautifull, neat and nice!
Awesome! What a great project! I enjoy reading about and seeing pictures/videos of what you do…you are very creative!
@Mom Out West
That was the result of higher-ups. I would guess that it’s because I’m just iffy enough with the content of my blog entries that it’s not “safe” to have me interviewed for the NYTimes. I’d probably say something a little off-kilter or inappropriate and then it’d be in the NYTimes etc etc.
I’m totally ok with it though. Just the fact that our blogs were in it is fine, and they mentioned one of my entries (Mattress Dominoes) so it’s all good.
@Parav
That would be due to the magic of Photoshop. We cleaned it up a bit for showing off, but it can get darker like that with minimal light.
@Southpaw
You don’t HAVE to be Course 2, but there are enough prerequisites (2.001, 2.005, 2.007) that almost nobody except for Course 2 juniors take it.
As far as milling and engraving the bottom of my macbook, that’d be a little dangerous. It’s much safer/more common to use a laser cutter, and in fact I’ve been planning to do that for a while. I’ll let you know how it works out!
now that is cool. i like how shiny and nice it looks at the end.
Thats cool, but its odd that your a MIT junior and your just now using these machines, but I used them as a sophomore in a high school engineering class.
@Josh
I took an English class during my sophomore year of high school.
@snively
plz check your email @mit.edu in a couple of minutes.Nothing stupid, I promise
Wow, awesome! I want to take that class.
That is totally awesome! Why is color of the second paperweight a little different from the first? Or does it appear different due to the light?
Nice and shiny. That equipment is amazing.
If there’s a reason to love course 2, this is it. Do you have to be majoring in MechE to take this class?
Maybe you could take it a step further and start personalising your stuff. Like popping off the bottom of your macbook and getting something etched on it?
WOW! that is so cool!!!! way to go guy!!! I look forward to doing that one day.
I would absolutely love to have that on my desk. Inspiration bonus + MIT motivation = Win.
Great job, by the way, Snively. Very creative. =)
Nice job Snively!
Haha yeah there must be footsteps on the Great Dome.
Nice machine :D
Hey, try to make a pawn then you are professional :D
Nice! I love it!
This post brings back great memories… My school used to have a nice CNC mill. However, they sold it this year, along with most of the machine shop and the class. :'(
PS. The footsteps on the dome are a nice touch.
Snively, this is undoubtedly my most favorite technical post EVER!!
Nice pics, Nice blog, Nice everything!!
Sorry, I’m a bit hyped up because this is finally a techy post after all the admission related blogs that people were posting (not that I didn’t find them useful) =]
AWESOME JOB!!
Unless I’m much mistaken, that hand that is not yours is actually Dave’s. Right?
– missing LMP!
Amazing,
Will I learn those skills and shape whatever I want? Definitely.
I can imagine what you felt after realizing the mistakes. xD
And again amazing, great work.
By the way, Snively, how come MIT doesn’t want to see certificates or any proof of what we write in applications? Do they have their ‘Secret Sources’ to find out if it’s true?
Just wondering =]
I personally think that this is incredible.
This is crazy awesome! One of 8,000 reasons why I want to be at MIT!
wow. Those machines are simply amazing! Beautiful work!! Hopefully, in a couple of years I’ll be there doing something like that. :]
What happened to the “ind stry” paper weight?
Snively – I’m psetting and decided to take a look at the blogs – kudos to you for putting up a sick entry on the paperweight.
Yours looks awesome! Glad it turned out well, good luck on the Yoyo,
And to all you pre-frosh out there- if you like building really, really,ridiculously, good-looking stuff/products – MIT is totally the place to go! They even gave me a plane ticket to China to work at a product design startup!
Come visit if you can!
And thanks again, Snively, for spreading the word
-kevin, mit ’11