6.08: Intro to EECS via Interconnected Embedded Systems by Cami M. '23
aka: the class that convinced me i belong at mit
NAVIGATION
The Class
Design Exercises
Final Project
The Final Product
final thoughts
Introduction
I entered MIT as a potential bioengineering major with big hopes of working in biomedical engineering and product design. Now, with my last final of my freshman year tomorrow, I am now a computer science major (with a potential double major in ???? because there’s too much I’m interested in), and I really have to credit one class for giving me the strength to declare the major that I did: 6.08
6.08 is one of MIT’s Intro to EECS classes, with each of the Intro to EECS classes having a specific focus or lens in which EECS is taught. This class focuses on embedded systems, specifically looking at connected devices, wearables, and IoT, taught by none other than Joe Steinmeyer.01 Joe is probably my favorite lecturer at MIT so far, even though I've only taken, like, 10 classes at MIT.
This blogpost will be pretty long! It’ll be an explanation of the class, my experiences with it, as well as documentation of my final project with some commentary! I really wanted to give a deep dive into an MIT class and I hope this provides some insight on what it’s like to take 6.08 at MIT!!
The Class
In January, I made the last minute decision to sign up for 6.08, after Raymond and Aiden had convinced me that I should just do it because it was going to be fun. Originally, I was pretty hesitant, seeing as I had no coding experience in Python or C++, aside from the three week Python intro class I took that January. Eventually, I decided to take it with the justification of “Fuck it, why not? I can just drop it if I don’t like it.”
Lectures met every Monday in 10-250, one of MIT’s larger lecture halls. It was a pretty popular class, with over 400 registered students taking it in our particular semester. I was put into the Tuesday, Thursday 7:30-10:00 lab section with Aiden, while Raymond had the 12:00-2:30 section, which was kind of a relief since I didn’t want Raymond seeing me code since I get nervous and embarrassed every time he watches me code. In lab, you are randomly paired with a partner, with whom you complete the lab and assignments for the rest of session. Office hours were offered frequently throughout the week for multiple hours at a time, as well.
I entered the first lecture not really knowing what to expect, but I was hopeful. Upon entering the lecture hall, Joe and some TAs passed out paper packets of the lecture notes, which we gratefully took as we headed up the stairs to get a higher seat since sitting in the front scares me.
I remember listening to the lecture and immediately feeling relaxed because of Joe’s casual, yet engaging lecture style. While a lot of the information was new to me, I found it easy to follow and I felt really excited to learn.
Lab 1
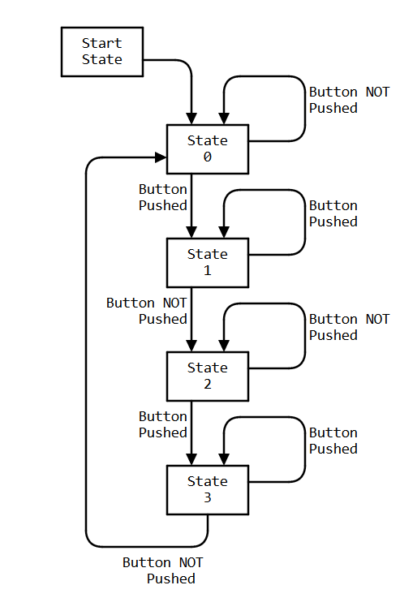
The next day, I had my 2 and a half hour lab session in Building 38. We had a pretty basic task of setting up our embedded system (an ESP32 microcontroller, an LCD, and a button) as well as acquainting ourselves with Arduino and C++ by incorporating a basic state machine.
However, I was really daunted by just..the class as a whole and I really struggled with actually getting my code to work. By the time lab was over, I hadn’t figured out how to do it, and I left feeling like a disappointment. Aiden and I walked back to Random, where Raymond was sitting at the table in Loop.
“How’d the lab go?” he had asked. “Did you guys finish?”
“Yeah, I did,” Aiden had said.
I nervously replied, “Yeah, me too.” A blatant lie. I was embarrassed to admit that I wasn’t able to finish it, and I became really doubtful of my coding skills, unsure if it would be enough to carry me through the class.
The next day, in Stud5, I spent the next two hours reviewing my code, trying to figure out where I had gone wrong. I looked up a tutorial online that did something similar to what we were trying to accomplish and followed it. I took my 6.08 kit out of the container, plopped it onto the green couches of the Stud, and started to work. I wanted to prove to myself that I could do it.
And I did!
Though it may seem trivial, this was a really big moment for me, hence why I remember it so clearly. It was confirmation that this class was, in fact, within the realm of possibility for me, even if it just took me a little longer than everyone else. And that’s okay.
Despite the accomplishment, I grew nervous for Thursday lab session to come. In 6.08, lab partners aren’t allowed to leave class until their partners are finished. This was a big source of my nervousness. I didn’t want to be the “bad” lab partner that took forever to finish an assignment, and I really didn’t want my lab partner to spite me for taking so long.
Lab 2
That Thursday, I was paired with a super smart kid by the name of Jay. Immediately, he was friendly, open, and warm. We introduced ourselves to each other, and I opened with the ever-so-charming line of “I’m really bad at code, so I’m sorry if I take a while.”
Luckily, he replied easily with, “Don’t worry! I can always help and I’m sure you’re not bad at coding.”
Turns out, Jay had been an LA for some coding classes at MIT and he was very, very knowledgeable.
That lab consisted of learning how to perform a proper HTTP GET request, where we would push the button a tracked number of times, and, based on the number of presses, the system will look up trivia on the number of presses occurred from a NumbersAPI and display it on the LCD.
After asking for some help from Jay, I ended up finishing the lab an hour early!!!
Design Exercises
Alongside our labs, we’re expected to complete 4 design exercises, which are mini-projects that help prepare us for the final project and make us feel more comfortable in our coding skills. I only did 3 design exercises, since I…well…got lazy and it’s PNR, but you can find them all here:
Weather
I’ve written about this design exercise before, but for those who don’t know, we had to develop a system that displayed weather characteristics based on user requests on the ESP32 system. We could use an Open Weather API to pull info to display the information requested.
For this project, I implemented a menu highlighting system, where the display screen listed all of the options, where it would then highlight the item selected. This was done by initializing a counter at -1 (so when the menu first displays, nothing is highlighted) and each item is assigned a number 0-6. Then, I used counter%6 and a series of ternary operators to determine the text color and highlight color.
I also created a request handler in Python that took in an input a-f and, depending on this letter, would return different corresponding information. I made use of .json() to format the results into dictionaries so it’s easier to parse.
To store information so that old requests are still visible, but new requests are displayed at the top, I initialized a char array storage. This stores past requests, where newest requests are stored at index 0 and the requests are then pushed farther down.
Smart Lamp
“For this design exercise you are to build a full smart lamp infrastructure as was discussed in Lecture 4. A basic system-level design of this system is shown below, comprised of a central server, supporting scripts and databases, as well as multiple clients. One client will access a web page that will allow them to POST the color and brightness of their smart lamp. The other client in this system (the smart lamp) will periodically poll the server for the color it is supposed to be.”
I created a request handler that returns a user-facing control rendered in HTML. I added a GET request with an input query ‘lamp’ in the loop of the code for the ESP32. If there is no input query, the server just returns the website itself. The lamp maintains colors via a database that stores color value, even if the web app is not actively being used.
The Clapper
“For this design exercise, you will build a sound-level detector which turns the LCD screen turns ON and OFF with two loud claps spaced about 0.5 seconds apart.
Here are some details on the spec:
- When the LCD is OFF (filled color of your choosing), the appropriately spaced double-clap-clap sound should turn it on
- When the LCD is ON (distinctive other filled color of your choosing), the appropriately spaced double-clap-clap should turn it off
- Your system should NOT respond if distinct loud sounds arrive >= 1.0 sec apart
- Your system should NOT respond if distinct loud sounds arrive < 0.25 sec apart
- Your system should NOT respond to loud continous sounds
- Your system shoudl NOT respond to continuous clap sounds
- We strongly encourage you to approach this problem using an FSM-based approach, however a correlation-based approach can also be productive! This is up to you.
- The code must be non-blocking so it can be effectively integrated with other systems.
- You cannot use the Arduino String class and outside C libraries must be kept to a minimum other than standard ones and/or code we’ve been using in class. Other libraries you should ask about.”
I used a finite state machine with 3 states: IDLE, CLAP, TURN.
It would move from IDLE to CLAP when it detected one loud noise that surpassed a certain threshold. I used the audio_displayer code to transform the audio into numbers and used 1.3 as the threshold after trying out some claps and figuring out a good number to use.
It would then move from CLAP to TURN if it followed the following criteria:
* The distinct loud sound arrived less than 1 second from the last one
* The distinct loud sound arrived more than 0.25 seconds from the last one
I did this using timers (non-blocking) within my state machine to detect if this distinct loud noise was occurring within the right time frame. If a noise arrived outside of these given specifications, then it would set the state back to IDLE and set the reading to 0 (so it didn’t jump back to another state immediately).
Final Project
We then had four weeks to come up, implement, and create a presentation for our final project. I teamed up with Shayna, Raymond, and Aiden.
Every week, we had to fill out a spreadsheet where we would fill out our goals for the week, as well as attach videos of the deliverables. We would also meet with our team’s assigned TAs once a week to talk about our progress and our deliverables. We could were given a budget of $100 to order parts needed for our project.
The paragraphs describing the deliverables below are directly taken from our reports, so the wording and descriptions belong to my teammates for their respective parts!
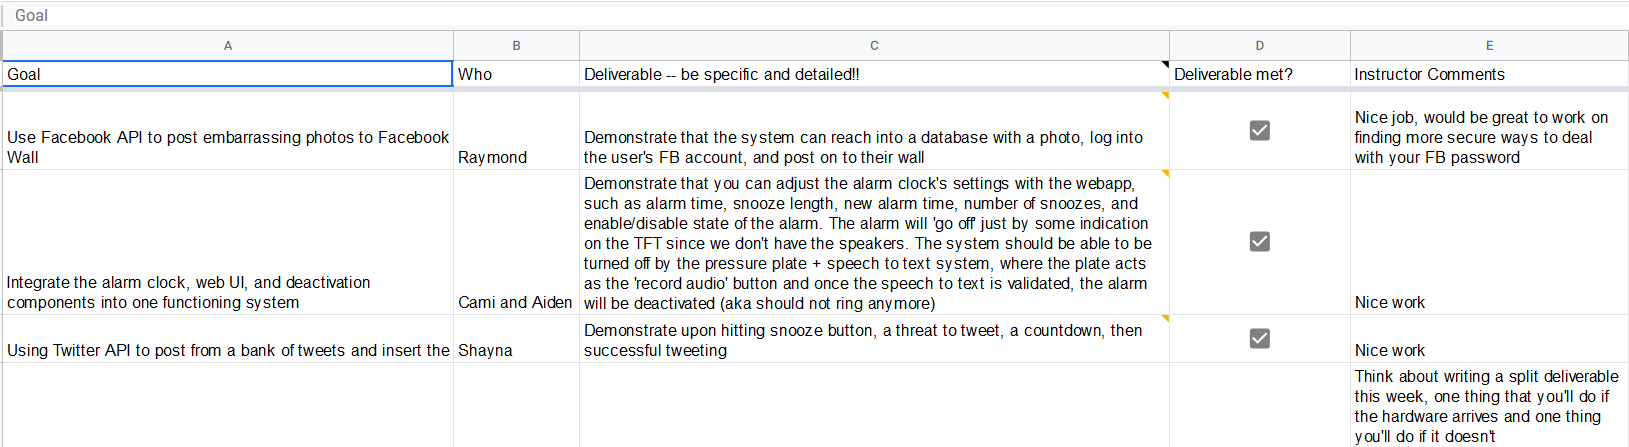
Week 0:
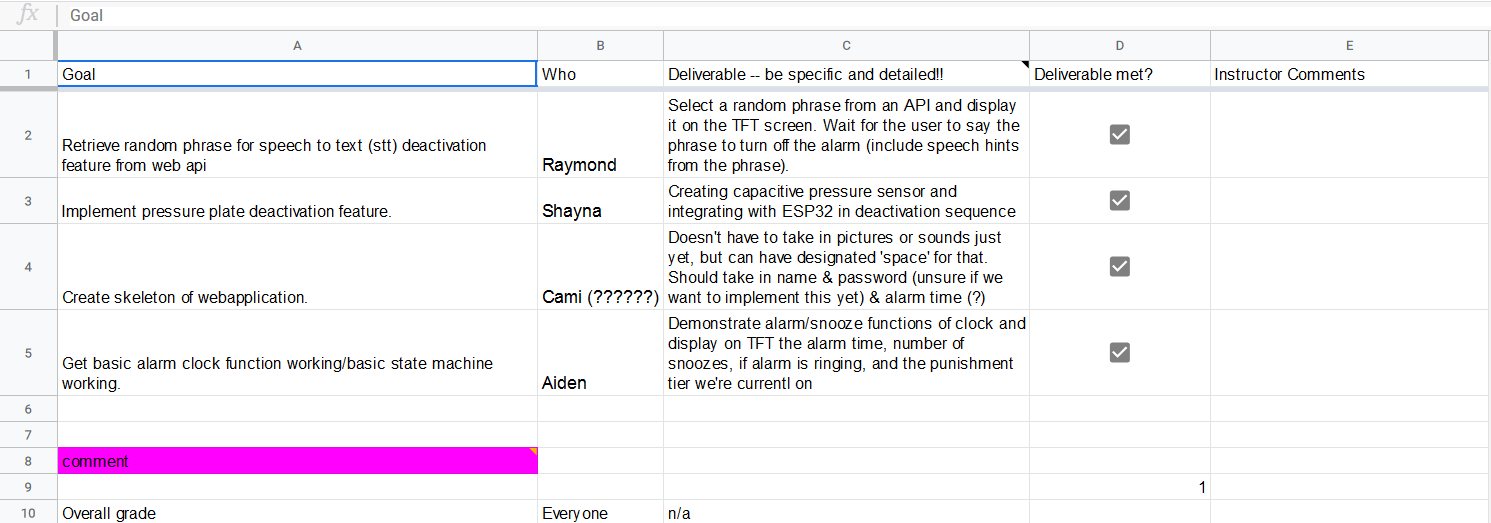
Goals and Deliverables
For this week, we had to come up with a proposal for our project.

These were our goals for the week.
For our proposal, we came up with an idea to create an alarm clock that punishes you for not waking up. The alarm clock would utilize a webapp that customizes the alarm clock, where you can set the alarm clock time, as well as upload files that can later be utilized in your punishments.
We created a four tier punishment system, where each punishment would apply to the next ring:
- Tier 0: basic alarm clock noise
- Tier 1: noise are angry — will randomly choose a song/noise from a playlist of: obnoxious meme music, shepard tone ascending, etc.
- Tier 2: the alarm clock will now insult you via text to speech insults
- Tier 3: the alarm clock will now ruin your relationships after it rings — it will announce it is now posting on Facebook and will randomly message someone Messenger or post embarrassing photos on your wall
For deactivation, a randomly generated phrase will be displayed on the LCD. In order to turn off the alarm clock, you must hold down a button and recite this phrase. We also discussed alternative methods for deactivation like:
- playing your ESP32 like a Bop-it
- screaming for a sustained amount of time – If you’re awake, everyone else should be up, too.
The system will also track if you are up and out of bed by requiring you to place your feet on the pressure sensitive mat made of aluminum foil and plastic wrap.
Reflection
This was a pretty last minute idea. I had spent the past week trying to think of meaningful projects, some even related to COVID, but I realized something lighthearted and fun would probably be more fitting as a final project.
Other ideas included:
- BakPak – put rfid tags on all your backpack items and give the backpack an rfid scanner to keep track of everything inside the bag
- Multiplayer galaga – aiden has a lowkey obsession with galaga. we clowned him for this idea, a lot.
- Webapp and smartwatch bracelet for your availability – a dashboard to see when your friends are available indicated by lights
- Artifical Sunrise/SAD clock – wakes you up with a slow sunrise LED pattern
As a general sidenote, this was our first initial proposal. We didn’t actually include all of the things listed here, nor did we just stick to the things listed here. We expanded upon it as the weeks came along and changed it as the project went, but this was the initial idea.
Week 1:
Our overall goal for this week was to create our individual parts for the overall alarm.
I was really nervous about this project because my coding skills weren’t as advanced as Raymond, Shayna, or Aiden’s, so I was really hesitant to contribute to the project. I didn’t want to disappoint anyone, and you can see the obvious hesitation in the amount of question marks in my goals and deliverables.
Goals and Deliverables
Shayna: Pressure Plate
Shayna created a plastic wrap and aluminum foil pressure plate. They taped either side of the aluminum foil to a piece of cardboard for more structure. In between the two aluminum foil sides were additional pieces of cardboard to assist the plastic wrap as a dielectric, keeping the two conductive sides apart from each other.
Cami: Web application
I approached this by creating a quick breakdown of all the things I had to implement so I could keep track of it, separating into three different tables of query, webapp pages, and database.
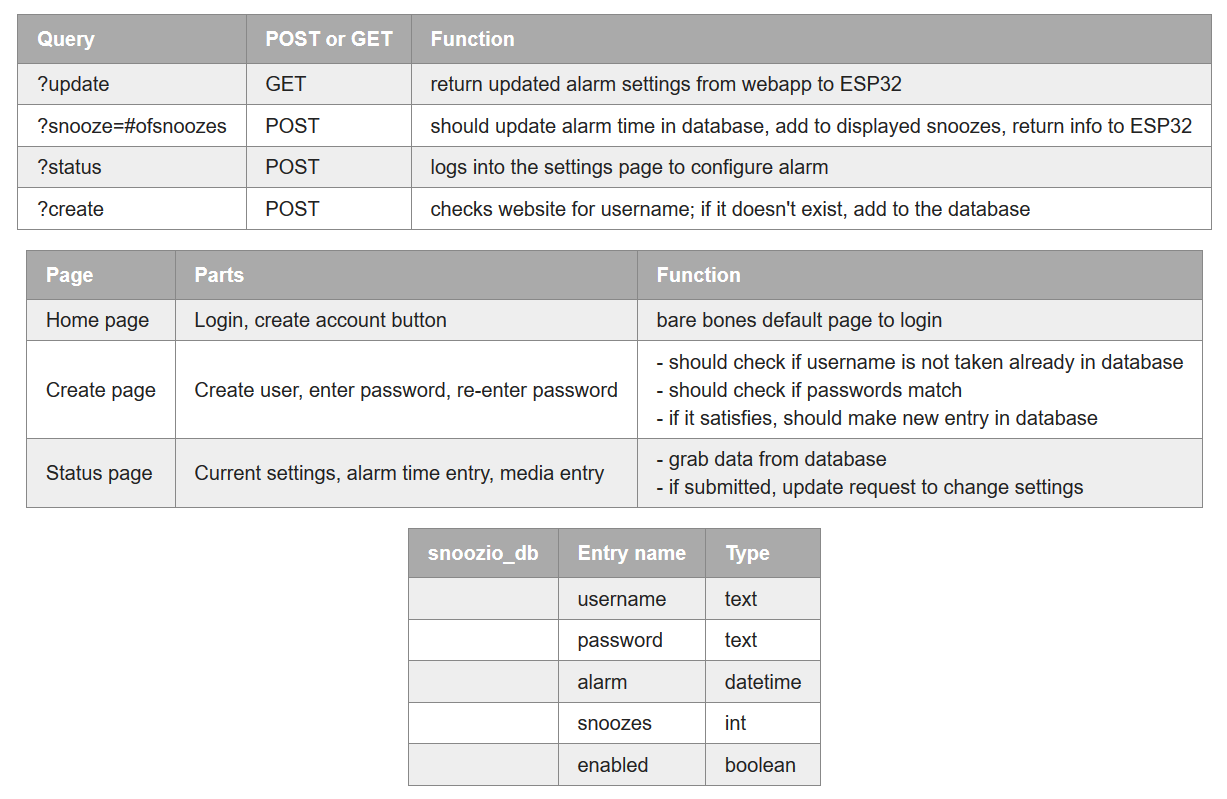
This was the skeleton of the webapp I wanted to make. We would eventually make changes to this and add things to databases, but the majority of this stayed the same.
I started making a base page with a simple log in structure that also made use of very basic JavaScript to ensure that the passwords matched on the ‘Create Account’ page. I also utilized the database to make sure each username was unique.
Raymond: Speech to Text
The server maintains the record of “talk goals” (phrases that must be said to turn off the alarm) for each user in a SQL database. These talk goals are retrieved from an external API, although they could easily be retrieved from our own database. The ESP32 sends requests to the server to display the next talk goal. When the user presses the button, audio is recorded, encoded, and then sent to the python server in base64 MULAW encoding. The python server then sends a request to the Google Speech To Text (STT) API, using the talk goal as the hint. The server assigns a similarity score between the STT output and the talk goal, and returns to the ESP32 whether or not the similarity score met a certain threshold (80% of goal), as well as the phrase returned from TTS. Back on the ESP32 side, if the request was successful (close enough to the talk goal), then the ESP32 clears the screen and requests another talk goal from the server.
Aiden: Alarm Clock
In order to implement the working alarm clock, we first started with a working clock from the watch face design exercise and then added the necessary functionality to make it an alarm clock. For the alarm clock features, there is one large state machine that governs the actions of the clock depending on the alarm time set on and retrieved from the server, and the two button inputs. The clock stays in the state IDLE until the current time is equal to the alarm time (as retrieved from server using POST request with user’s username), then proceeds to the PUNISH state which will send another POST request to the server and in the future, carry out a random punishment within the appropriate tier set by the number of snoozes. Once the punishment has been enacted (if the clock has already been snoozed once), the state machine then proceeds to the ALARM state in which the screen starts flashing. From this state, the user can deactivate the alarm by pressing the left button (for demo purposes, will be integrated with speech to text and pressure sensor in future), or press the right button to snooze. If the alarm is snoozed, it will increment the snooze counter by one, and send a POST request to the server to update the user’s information in the server’s database; the new alarm time is then set to be the old alarm time plus the snooze time. If the alarm is deactivated with the the left button, then the snooze counter is reset to zero, that information updated on the server, and the new alarm time is set to whatever is currently designated on the server for the user.
Reflection
This first week was by far the most stressful. I was really nervous about not being able to get the web app working, and I didn’t know how basic or complex it had to be. At first, I was going to do the entire thing in JavaScript, but I’d literally never worked with it prior to this project, so I decided not to be that ambitious. I just didn’t know what they wanted from this project and so I was freaking out because I wanted to be a good team member. I spent hours working on this and just never felt the work I did was good enough. So, when I received praise at our TA meeting, I felt relieved.
Week 2
This week’s goal was to integrate our parts from last week, as well as experiment with the social media aspect of the punishments.
Goals and Deliverables
Raymond: Facebook API
After inspecting the Facebook API, it turns out it doesn’t let you do very much at all. Facebook removed the ability to post on a user’s wall as of late 2018. The API only lets you post on a facebook Page, with the added restriction that your app must undergo Facebook App Review. App Review is a process where Facebook manually downloads and inspects your application to ensure it meets Facebook quality standards. Without undergoing App Review, you aren’t allowed to make any real posts (any posts made through the API in developer-mode only appear to the developer; not his friends).
To get around this, I’ve decided to use a headless browser to actually navigate to Facebook.com and perform posts/messaging actions. Unfortunately, this means that somewhere in the program we have to store plaintext facebook passwords, so this changes the overall design as follows:
Instead of storing users’ Facebook passwords on the 608 server in plaintext, the user now has to download a python script and keep it running on their computer. This also handles problems regarding Facebook 2-Factor Authentication. It does mean that they’d have to keep their PC on while they sleep, but perhaps in the future this can be mitigated with a smaller device like a Raspberry Pi.
On the 608 server, a user can upload an image, which gets converted to a base64 string with javascript. When the user clicks POST, the base64 string is stored in a database mapping usernames to base64 image strings.
The client-side python script occasionally (10s) polls from the 608 server. The script decodes the base64 image strings back into images, then logs into Facebook using a headless web browser and performs the post action. When successfully posted, the script sends another POST back to the server reporting the success, so the server can remove the entry in the database.
Along with posting to a user’s wall, I’ve also implemented sending messages to the user’s friends through messenger.com.
Cami and Aiden: Alarm Clock Integration
Essentially we worked to ensure that the alarm clock made the proper POST requests with the username in the body to the server so that the server could return all of the clock parameters (alarm time, snooze length, if the clock is enabled or not, and the current number of snoozes) that can then be displayed on the ESP32 after parsing. This also prevents discontinuties in value between what is stored on the ESP32 and the server so that, for example, the snooze count on the ESP32 always matches what is present for the user in the server’s database. Additionally, we were able to implement both Shayna’s pressure pad and Raymond’s Speech-to-text features from the previous week into the state machine of the ESP32 so that once the alarm state is reached, the user can press a button to start the deactivation process in which the user must repeat the shown phrase while triggering the pressure pad.
After completing these main objectives, we also included some code on both the server and the ESP32 to add timezone adjustments to the system so that a user can input their timezone and not have to worry about their alarm going off at the wrong time.
ps if you’ve read this entire thing this entire way comment your favorite fruit cause thats highkey impressive thank you for reading this
Shayna: Twitter API
To allow the ESP32 to post to Twitter, I created a countdown setup that led to a POST request that posted a tweet to my personal Twitter account.
I first imported the Button class and support_functions.ino used in previous 6.08 exercises to control the behavior of the two buttons and help send the POST request.
After all the initializations, I used a simple state machine to move through three states. The first where stateofus == 0 was an initial state that printed “Get up now or I’m tweeting.” 2 seconds later, it moved to stateofus == 1, the countdown state, where it was printed on the TFT a countdown from 10 to 0. The countdown could be interrupted by a press from the second button, representing the deactivation action. After the countdown ran out, it moved into the send state, where it sent a POST request to a webhook that posted to my Twitter.
Reflection
This week, I didn’t feel like I contributed all that much. I basically only did the timezones thing which made me feel pretty bad, but I also was the one compiling the writeups every week, so I feel like it balanced out somewhat?
Every time we had our weekly meetings with our TAs, I always said I was gonna shit myself or something along the lines of that because I really didn’t want to get yelled at by my TAs after I was trying so hard. Petey knows this. I met with him every week and he would ask me, “What’s going on?” and probably every single time I replied with “I’m really nervous about 6.08.”
Luckily, we never faced any harshness or wrath from our TAs! They also praised our Week 2 work, which calmed down my nerves a teensy bit.
Week 3
The goal for this week was to fix up aesthetics and implement more features for the alarm clock now that the basic skeleton was working.
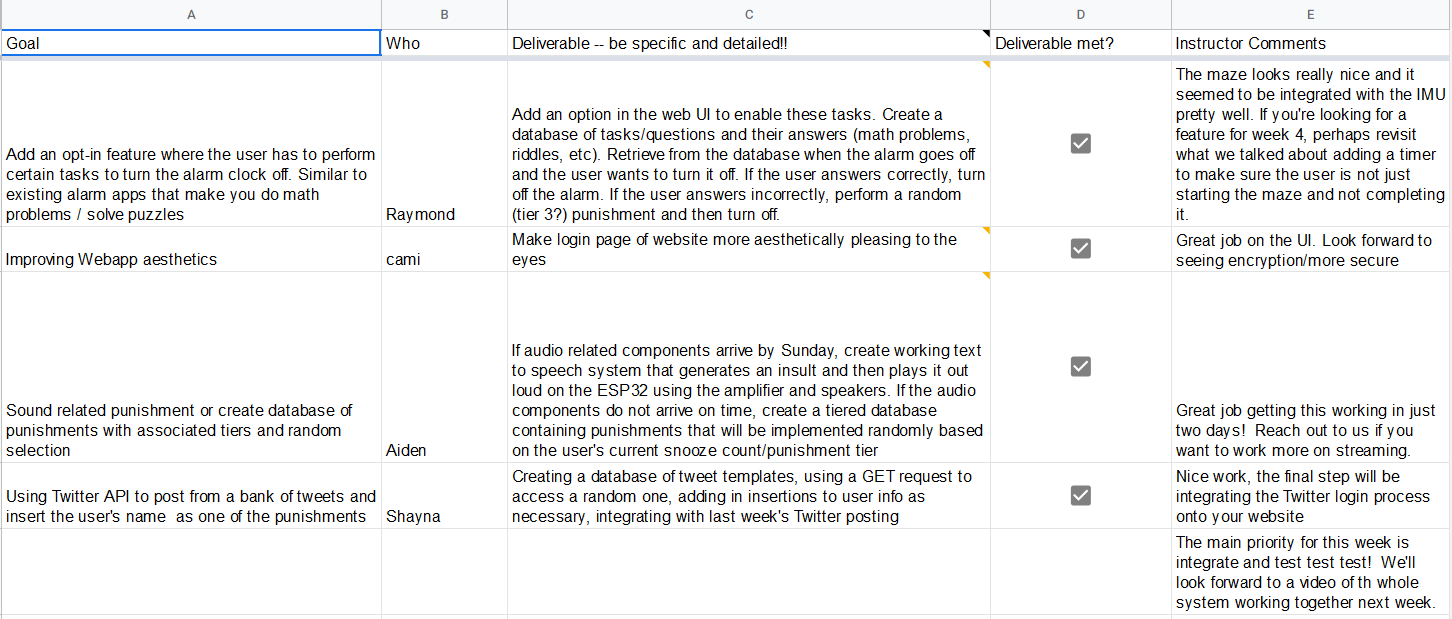
Goals and Deliverables
Raymond: Additional Deactivation Method
As one of the “deactivation features”, I’ve implemented a randomly-generated maze puzzle controlled by tilting the alarm clock.
Maze Generation:
The maze is defined as a 2D array of integers, with 0 as empty, 1 as a wall, 2 as the player location, and 3 as the goal location. The board is initialized to be entirely full of walls.
The esp32 uses depth first search from a random starting location to “carve-out” a maze.
Neighbors are selected in a random order (NORTH, EAST, SOUTH, WEST), in order to ensure a random-looking maze.
After the maze is generated, the first blank cell from each corner is selected as starting and end locations.
Movement of the player is done similarly to the etch-a-sketch design exercise, where we read accelerometer data and check if the player can move into another empty cell.
Cami: Webapp Improvements
I started off by designing the logo for snooz.io, using Photoshop to take a vector of a crescent moon and adding in the little z’s. Then, I started to try and come up with a basic, minimalistic layout for the website. This included choosing the cool blue background I use for all the pages for the website.
I started adding smaller touches like changing the mouse pointer to a pointer when hovering over submit buttons, making it so when the page isn’t fully sized, the information still adapts to the screen, etc.
I also implemented an automatic slideshow at the bottom that shows off pictures of our alarm clock. This slide show also has these cute little grey dots I added at the top to show how many images there are! I took the script from W3 since I really don’t have that much familiarity with JS, but I do understand how it works! I hope in the future, once our alarm clock is finished, to transform this into an area where we can put more information about our alarm clock with videos of its functionality, greater detail on its features, and a complete list of punishments and the tier system! Along with this, I adjusted the webapp to include the alternative deactivation methods for the maze and the trivia.
Aiden: Punishment Database/TTS Audio
First, I created the punishment database that would live on the server and the function to access it; essentially, the function will be called whenever the punish state is reached on the ESP32 and a POST request is sent, then when the function is called, it will randomly select another function to call to execute a punishment based on the user’s current punishment tier. This is acheieved through a dictionary of punishments where each key corresponds to a tier and the object for each key is a list consisitng of different functions to call (for now the functions are placeholders).
After implementing this, I decided to go ahead and implement some of the audio punishments even though I did not receive the hardware until Tuesday. To do this, I essentially just uploaded the audio files I wanted onto an SD card for the MP3 player and made the ESP32 play back the files based on what tier of punishment the user is at (default alarm tone for no punishment, aggressivley loud noises for tier 1, text-to-speech insults for tier 2, meme-y music for tier 3).
Shayna: TWitter API continuation
This python file twitter_handler takes in a POST request with the parameters of username, a random number from 1 to 12 inclusive, and the number of times the snooze button has been hit. The handler selects the tweet message from a database, corresponding to the random number. The handler then returns the message “USER has hit the snooze button x times.”, with USER replaced by the username and x replaced by the number of times the snooze button has been hit, followed by the selected tweet message.
If the database is empty (first call), it populates the database tweets.db with the 12 tweet templates.
I also updated the EPS32-side code with an appropriate POST request to this file with the username, random number, and snooze button hit number parameters.
Reflection
This was the week I had a really bad mental breakdown because of 6.08 because I felt like I wasn’t contributing enough and lowkey Raymond clowned me for not doing enough and “just making the website pretty,” which I’m sure he didn’t mean anything Mean from it but it made me feel bad so I cried a lot and felt like I was useless and not doing enough for the project. So, I basically announced in the group chat “hey i’m in a really shitty place mentally and i’m not gonna work on this further” (because I was given more work to do) and just shut Messenger and opened Spotify and blasted music while staring at the ceiling.
But jokes on me, I guess, because the TAs told me the website looked really nice and they were pleased with the work I did so I guess I cried all night for nothing. But yeah. It was rough.
Week 4
For this week we were just wrapping up on the project.
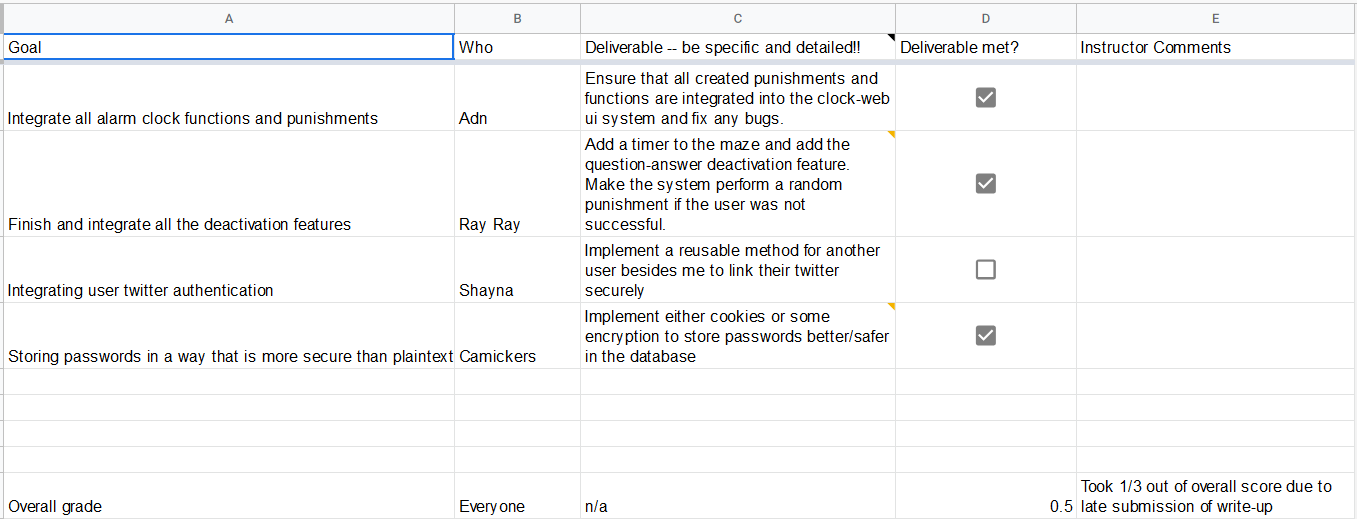
Goals and Deliverables
Raymond and Aiden: Integration of features, punishments, and deactivation
In order to integrate the Facebook posting script into the Snooz.io system, first the user uploads their chosen image onto the web ui, then when the user hits the third punishment (I use postman to emulate the ESP32’s POST requests), the Facebook script can then be enabled to post to the user’s Facebook wall.
In order to implement the trivia method of deactivation, we took the trivia design exercise and converted it into a simple function that returns a specific value when the user answers a question correctly, which then deactivates the alarm clock.
To implement the maze as part one possibly deactivation methods, we simply inserted the necessary functions to both generate and display the maze into the state machine of the alarm clock and added a countdown timer that displays on the bottom how much time the user has left to solve the maze before the clock is automatically snoozed.
if you’ve made it this far along with your fruit comment your favorite color so like “yellow strawberry” would b mine also if no one comments ill understand this is a long blogpost
Cami: Encryption
I imported bcrypt after researching some other things and found it was easiest to use. I first ran into some issues with bcrypt wehre the passwords weren’t matching but I found this StackOverFlow post that explained the issue I was running into. Essentially, I just needed to make sure they were being encoded the same way (utf-8) for consistency and to avoid running into a TypeError.
Shayna: Twitter API
This week I looked into linking user Twitter login on the website side but could not determine a suitable way to integrate this feature.
Reflection
This week we lowkey gave up because we were tired and didn’t want to try that much and we already knew we passed 6.08 because just PNE/IE things.
The Final Product
Final Thoughts
Overall, 6.08 was a series of ups and downs for me. The class, being an intro class, obviously is not the hardest thing I’ll encounter at MIT. In fact, my friends went through the class like it was a breeze (specifically Aiden and Raymond) which was unintentionally really hard on me. I felt lesser than a lot of my friends because this content didn’t come to me as quickly as it did everyone else, and there were a lot of times where I really struggled with the online exercises and needed a lot of help with it.
But when I look back on 6.08, I feel really proud of myself. Like, extremely so. To some, these tasks and design exercises might be small and simple, which, maybe they are. But to me, they’re moments of growth. I went from not knowing a word of C++ or Python to being able to code these kinds of projects. And while they’re not the most challenging, they represent something a lot deeper. Validation. Proof.
As mentioned before, I debated with myself about the prospect of transferring from MIT. I was really unsure if I could handle being a computer science major at MIT, and maybe if I should switch to a school that would cater to my interest in media and humanities better than MIT could (not that MIT is bad at the humanities, but I wanted a fresh start. I didn’t want to be reminded of my failure to be a CS major constantly, so I thought a change of environment could help with that.)
But with a lot of help from friends and instructors, I was able to push through and see myself become a little bit better each week at coming up with solutions for problems, a little bit keener on debugging code. Don’t get me wrong, I lurked on Piazza like 24/7 and if I had a penny for every time I submitted a question on Piazza, I could probably by myself a pizza slice from Costco.
6.08 was the class that made me want to transfer from MIT, but it was also the class that made me want to stay. I’ve learned so much from this class alone, probably more than I did in my entire senior year of high school, if I’m being completely honest, and I’m really grateful I ended up taking this class. There were so many doubts flying through my mind about being here at MIT, but the faculty’s eagerness to help and my friends’ kindness really helped me through this class.
So, TL;DR 6.08 is a great class. Shoutout to Shayna, Aiden, and Raymond. Thank you for helping me through the project. Shoutout to the TAs that helped me, specifically Ben, Allison, Ethan, and Nikhil. Big shoutout to Joe Steinmeyer.
And to close out this blogpost, here’s one of my favorite moments from class: